How To Rename Multiple Files with the Batch File Rename Utility
(Updated 2/21/2012)
- How do I use Batch File Rename? (overview)
- Add Prefix Feature
- Add Suffix Feature
- Rename According to a Text File
- Replace Text Features
- Trim Characters from the Start of a File Name
- Trim Characters from the End of a File Name
- Serialize Feature
- Replace Entire Name
- Change Case of Filename
- Revert to Previous Name
- How does Pre-sorting work?
How do I use Batch File Rename?
Using the Batch File Rename is easy and flexible. The program acts as a droplet, which saves you the step of launching the program and adding files. To use the Batch File Rename program the first time, simply drag and drop the files that you want to rename onto the BFR app icon:
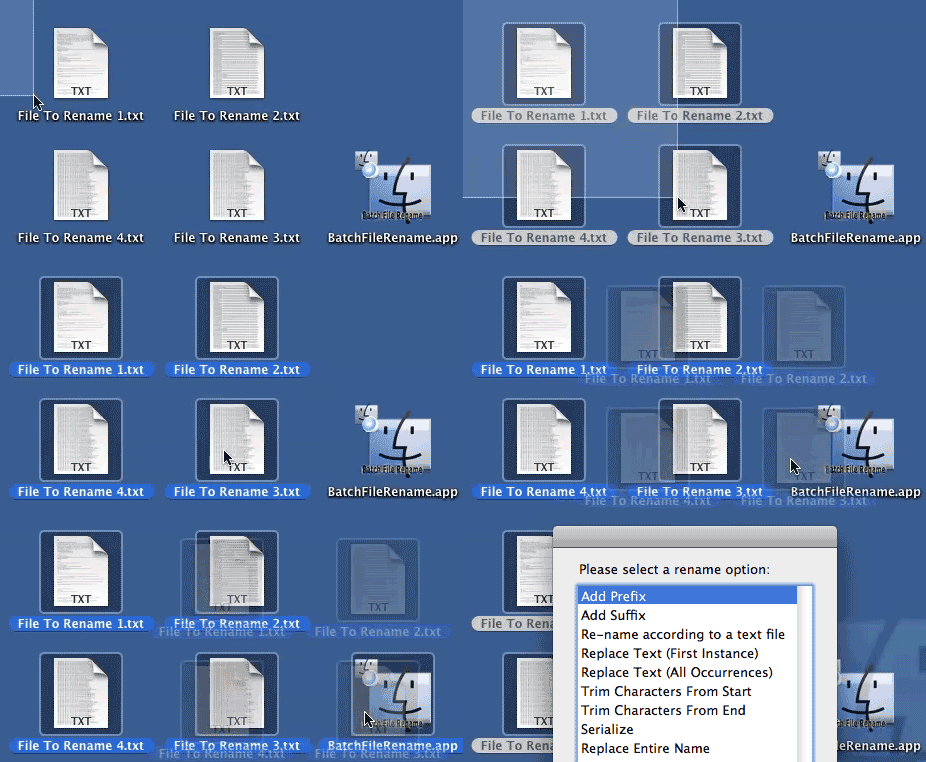
Once your files are loaded into the Batch File Rename App's memory, you are presented with a number of renaming options in a window: 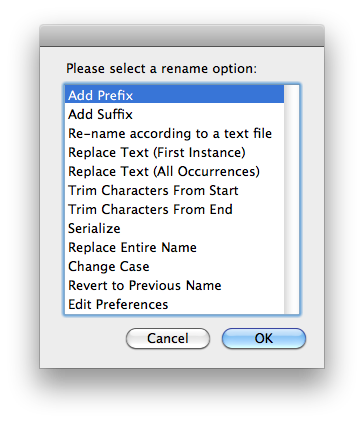
In this window, you can select one of the many options for renaming your files all at once. We will discuss each feature below in detail. Sometimes, it takes a little bit of creativity to come up with a strategy for renaming your files - but with the variety of options that Batch File Rename provides you, almost any renaming option is possible! If you are having any trouble deciding which option to use, read below. If you still need help - contact us! We're always willing to help, and if you find a rename feature /option that is missing, let us know; we will be happy to add it for you!
Add Prefix Feature
When you select the Add Prefix feature, the app will prompt you to type in some characters that you would like to add to the beginning of the file name. The same prefix is added to all files. An example of when to use this feature is if you have more than one set of photos in separate folders that you want to combine into a single folder. If there are duplicate names, Finder will not allow you to put all of these files into the same folder. If you add a prefix to each batch of files in the separate folder, you can later sort them by name - but still have them all in the same folder.
Add Suffix Feature
Much like the Add Prefix feature, adding a suffix is very simple. This rename feature can be useful if you are trying to add an extension to a batch of files. For example, if you have a bunch of images, but they do not have the ".jpg" extension, you can simply add it by selecting this feature, and then typing in ".jpg" in the box. Changing file extensions can also be done by using the "Replace Text" feature, or the Trim Characters (and then adding back in the suffix).
Rename According to a text file
This feature is a little more complicated than the other options.
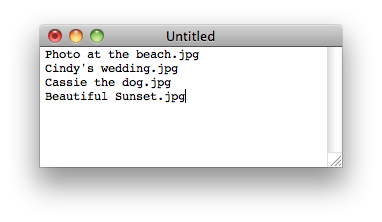 The first step is to save a text document on your computer with a list of new names each name separated by a carriage return (the 'return' or 'enter' key on your keyboard). See the image to the left for an example. Before saving the file, make sure that you are in "Plain Text Mode." To switch between rich text and plain text, press "Command" + "Shift" + "T". While in "Rich text" mode, there will be a ruler at the top of the window. Plain text (the one you want) has no ruler.
 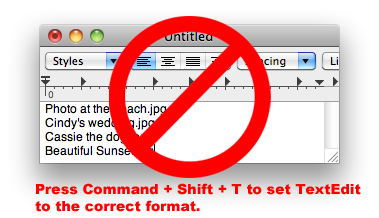 Once you have saved the text document, drag the files you want to change onto the Batch File Rename Program. The program will load those files into memory, and then prompt you to choose the location of the text file that you just made. The program will then sort your files using the file sorting method that you have selected in Batch File Rename preferences. Then, it will replace the first file name with the first name in your list (and so on).
Replace Text
The replace text features work just like the "Find and Replace" features in your favorite text editor. To use this feature, drag the files you want to rename onto the Batch File Rename program icon. Once the files are in memory, select the Replace Text feature (you can replace the first occurrence of the text, or all occurrences). A window will pop up, prompting you to enter the text that you want to search for. Next, a window will appear prompting you to enter the text that you want to replace it with. This feature can be extremely handy - and can be a quick way to rename a batch of files.
Trim Characters from the start
This feature is very simple to use. Just drag the files you want to rename onto the Batch File Rename program icon. Once the files are in memory, choose Trim Characters from start, and enter a number. The app will then remove that many characters from the beginning of the file name.
Trim Characters from the end
This feature is very simple to use. Just drag the files you want to rename onto the Batch File Rename program icon. Once the files are in memory, choose Trim Characters from end, and enter a number. The app will then remove that many characters from the end of the file name.
Serialize Feature
You can add serial numbers to your file names if you wish. This feature will take the existing file names, and add a number to either the beginning or the end of the file name (you choose). Drag the files you want to rename onto the Batch File Rename program icon. Once the files are in memory, choose Serialize, and enter a number. You may want to start with the number 1... but if you have more than 10 files you want to rename, and you want them to sort correctly in the Finder, you may want to start with a larger number. For example, if you have 100 files, and you add the numbers as a prefix, Files may sort in this order: 1,2,20,21,22,23,24,25,26,27,28,29,3,30....etc... This may not be what you want - so for 100 files, we would recommend starting with 100. That way, your files will sort in this order: 100,101,102,103,etc... Also, please be aware that Batch File Rename will pre-sort your files using the file sorting method that you have selected in Batch File Rename preferences before adding the serial number. The default pre-sort is alpha-numeric. In other words, they will be sorted the same way as finder sorts them in "list view" or "column view." We have added another option (in the preferences) where you can check a box to
Replace Entire Name
The replace Entire Name feature will ignore the existing name of your file (but it will keep the suffix - like ".jpg" for example). You will be prompted to enter a new file name for all of your files, and then the program will add serial numbers to each successive file. There are a couple of ways to use the Replace Entire Name Feature. For example, if you choose the base name to be "Wedding Pictures," (at the first prompt), and you select "100" as the starting serial number, the program will create Wedding Pictures-100.jpg, Wedding Pictures-101.jpg, Wedding Pictures-102.jpg, etc... Another way to use this feature is to leave the base-name field blank, and then just supply a starting number. If you do this, and provide a starting number of 100, your files will be named 100.jpg, 101,jpg, 102.jpg, etc. Remember: the Replace Entire File Name feature will pre-sort your files using the file sorting method that you have selected in Batch File Rename preferences.
Change Case of File Name
The Change Case feature allows you to rename your Mac files in 3 different ways. You can make every character upper case, every character lower case, or you can elect to have the first character of every word be upper case.
Revert to Previous Name
The Revert to Previous Name feature give you one level of undo. If you are not satisfied with the way your files were renamed, you can just undo it. Typically, we recommend that you duplicate your files prior to batch renaming them. This is the safest option that will guarantee that you do not lose any files due to unanticipated renaming results. Nevertheless, the undo feature of Batch File Rename can absolutely save you in a pinch if you forgot to duplicate your files before renaming them.
Pre-sorting
For some renaming scenarios, it makes the most sense to pre-sort the files. 3 of the file rename options pre-sort the files. Those 3 options are "Rename According to Text File, Serialize, and Replace Entire Name." For example, with the "Rename According to Text File" feature, if you make a long list of file names for each file, you are going to want for the first file you see in finder to get the first name, the second file in Finder to get the second name in the list, etc. The default pre-sort is alpha-numeric. In other words, when you drag and drop files on BFR, they will be sorted the same way as finder sorts them in "list view" or "column view" when you are sorting by name.
 We have also added another option (in the preferences) where you can check a box to have the items sorted in the same way that you have arranged them in "icon view." In order for this option to work correctly, you will need to have Finder's "Snap To Grid" feature turned on (how to do this).
 How to turn on Snap to Grid in Finder
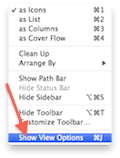 In order to use the "Sort by Window Position" feature, you will need to have "Snap to Grid" turned on. Snap to Grid is a setting in the Finder that allows your icons to be positioned neatly - directly above each other, and directly below each other. To turn it on, open the folder in "Finder." In the menu bar (top of your screen), there is an option called "View." Click on that, and choose "Show View Options" from the menu that appears. Next, in the new window that appears, go to the "Arrange By" drop down menu. In that menu, select "Snap to Grid" as pictured on the left.
 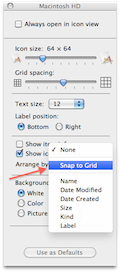 Once you select that option, you can close the little preference windows, and begin to arrange your icons in the order that you want them to be batch renamed (top left to bottom right). You will notice that if you do not position the icons precisely in the grid, Finder will neatly auto-adjust them to the nearest grid position.
Page Last modified: October 18, 2014
Buy Multiple File Renamer ↓
Download a Free Trial 
Supported OSs:
Big Sur (11.0) end-of-lifeCatalina (10.15) 64-bit
Mojave (10.14)
High Sierra (10.13)
Sierra (10.12)
El Capitan (10.11)
Yosemite (10.10)
Mavericks (10.9)
Mountain Lion (10.8)
Lion (10.7)
Snow Leopard (10.6)
Leopard (10.5)
Tiger (10.4)
Panther (10.3)
